The real problem is not your task list. It’s client collaboration.
Let me paint a picture that might feel a little too familiar. A web design project is humming along. You know what you’re doing. You’ve designed a hundred homepages. You’re not the problem. But the project? Still derailing. And not for the reason you’d expect.
It’s not the design work. It’s everything around the design work. Content is in a Google Doc your client hasn’t touched in two weeks. Images are somewhere in a text thread you’d need to scroll for 45 minutes to find. Feedback landed in an email.
The approval? A DM at 11pm. And at least once this week, someone said, “Can you resend that link?” And you smiled and resent it, even though it was the fourth time.
Could your client communication process BEEEEE any more scattered? (Sorry. Had to.)
Here’s the thing: this is not a “bad client” problem. It’s a systems problem. And a Notion client portal is the fix. When your client has one single place to go — for what’s happening, what you need from them, what to review, where to upload content, and where decisions live — everything calms down. Less chasing. Fewer resends. Fewer “wait, where did we land on that?” moments for both of you.
What an organized, low-stress client portal actually is (and isn’t)
Let’s clear something up right away, because I know what you’re picturing. You are not going to invite your client into your entire workspace and pray nothing breaks. That’s not a portal. That’s chaos with a Notion logo on it.
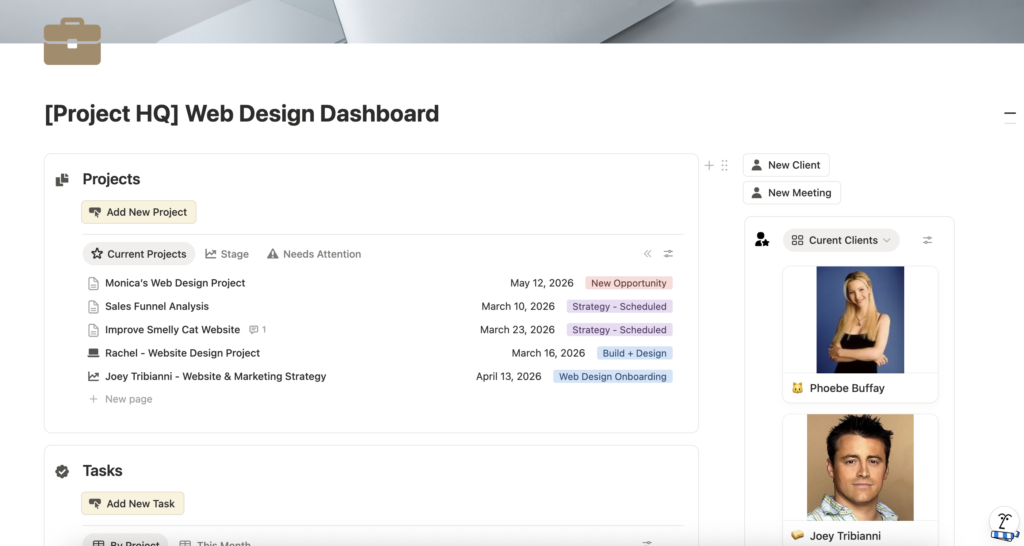
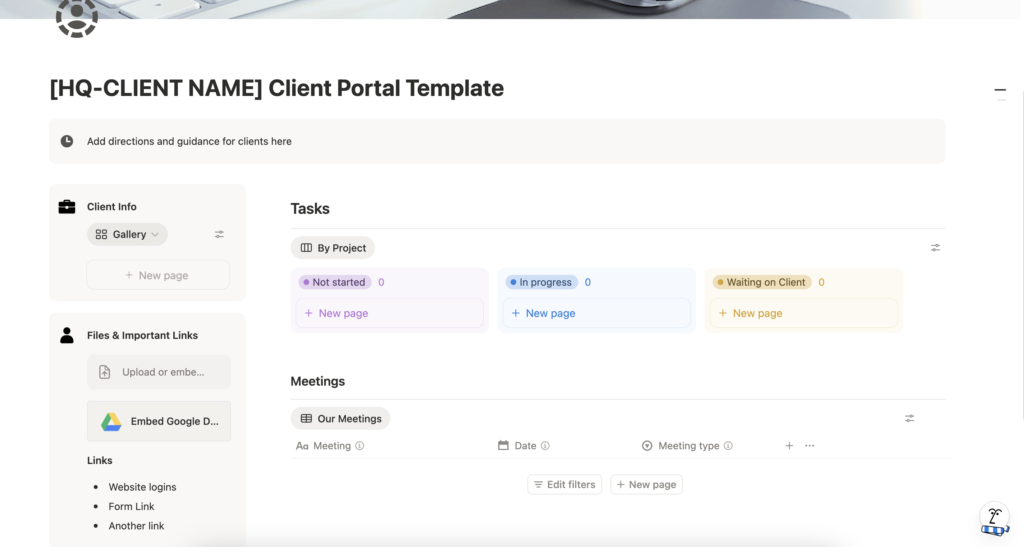
A client portal is a single page that acts like a front door. It’s the one link you send your client, and it contains everything they need — nothing more, nothing less. Think of it this way: Notion is the hub, your Project HQ is the project home, and your Client Portal page is the client-facing view. Your client gets the front door. Your internal system stays safely behind it.
The goal is a portal that’s simple enough your clients actually use it, clear enough they know exactly what to do, and contained enough that they can’t accidentally wreck the rest of your workspace. (It happens. Let’s build in the guardrails from the start.)
Want the done-for-you version? 😄
The Web Designer’s Project HQ Template includes a clean Project HQ + client portal structure already set up, so you can start using it today.
The 5 sections every web design client portal needs
This is the exact structure I use inside my Client Portal Template, and I’m sharing it here with zero gatekeeping. You don’t need 12 sections. You need 5 sections your clients will actually open and use. Here’s what those look like.
1) Directions + how to use this portal
I know it feels obvious to you. It is not obvious to your client. Set expectations from day one: what the portal is for, how you like communication handled, where to leave questions (use comments!), and how often you’ll post updates. A 4-sentence intro at the top of the page saves you roughly 40 “wait, where should I send this?” emails per project. Worth it.
2) Client info (pulled from your Client Database)
This section is a linked database view, which means you are not retyping the same client details into every single portal. Create the client once in your Client Database, display the key fields here (name, email, time zone, etc.), and update it one time. Done. It updates everywhere it appears. This is one of those Notion features that feels like a small thing until you’ve used it once and realize you’ll never go back.
3) Files & important links
This is the “stop hunting for assets” section, and it is one of the most-used sections in any active project. Include the Drive folder link, brand files, login handoff notes (handle these responsibly!), the staging link, any form links — basically anything your client might need to find again. If it could generate a “Can you resend that link?” email, it belongs here.
4) Tasks
This is your anti-chasing section, and I want you to keep it short and obvious. What do you need from the client right now? What’s the due date, if there is one? That’s it. You are not building a project management system for your client here. You’re giving them a simple, clear answer to “what’s next for me?” If they always know what they owe you and when, you spend a lot less time following up.
5) Meetings (notes + decisions)
This is the section that saves your revision sanity. Feedback lives here. Approvals live here. “We decided on the navy blue header” lives here. When your client asks you to change something you already changed based on their earlier feedback, you open this section, find the decision, and politely reference it.
A decision log is not extra work — it’s insurance. Build the habit of putting meeting notes and approval confirmations here from week one, and future you will be very, very grateful.
Organized, low-stress workflow tip: You do not need 12 portal sections. You need 5 sections clients will actually use.
The portal layout (it’s created with your Web Design Project template)
Here’s where the magic really kicks in. In my workflow, the Client Portal page is part of the Web Design Project template, which means it gets created automatically every single time you start a new project. You are not rebuilding it from scratch.
You’re not hunting for last month’s version to copy. It just shows up, ready to go, because you built the system once and now it does the work for you.
What you set up each time is the “connected” pieces — the linked database views that are filtered to the current project. Think of the portal page itself as a reusable frame. The views inside it are what make it specific to this client, this project.
Client Portal sections (same every time)
Directions (start here)
- How to use this portal:
- Upload files in the Files & important links section below.
- Leave questions and feedback as comments right on the page.
- Check Tasks to see what’s next.
Client info (Client Database view)
- Add a linked view of your Client Database.
- Filter it to the current project’s client.
- Show only the fields the client should see (example: name, email, time zone).
Files & important links
- Drive folder:
- Brand files:
- Website logins / access notes:
- Form link:
- Other links:
Tasks (Tasks Database view)
- Add a linked view of your Tasks database.
- Filter it to the current project.
- Optional: show a client-facing view (only client tasks + approvals).
Meetings (Meeting Notes Database view)
- Add a linked view of your Meeting Notes database.
- Filter it to the current project.
- Optional: create a client-facing view that only shows the meetings you want them to access.
What to lock vs. what to let clients edit
This is the part where portals either stay calm and organized… or turn into the Wild West. I’ve seen both. We’re building the calm version.
Think of it like your kitchen. You’re happy to let a guest grab a glass of water. You are not handing them a ladle and asking them to reorganize your pantry. Same energy here. Give clients just enough access to do what they need to do — and nothing else.
Let clients do this
- Add text in clearly labeled sections
- Upload files
- Leave comments
- Duplicate a section if they need more space (content gathering is rarely one-and-done, and you want them to keep adding without texting you for permission)
Don’t let clients do this
- Edit your internal project plan
- Touch your master databases
- See other client projects
Simple rule: keep the portal page client-facing and your Project HQ/internal dashboard completely separate. They live in the same workspace. They should never feel like the same thing to your client.
Comments, reminders, and approvals (without making it complicated)
Notion makes collaboration genuinely simple once your clients know how to use comments — and that starts with you telling them. Don’t assume they’ll figure it out. Add one line to your directions section: “Leave feedback as a comment right on the section you mean.” That one instruction eliminates a surprising amount of email chaos.
A few practical rules that keep things clean: create a tiny Approvals list so you can see what’s waiting at a glance. If you want reminders for client tasks, add a due date in your internal system and let you be the one who gets notified.
Your client doesn’t need to see every alarm you’ve set. They just need to see what you need from them.
A quick note on reporting (the concern everyone has)
At some point, you’ll want to look across all your active portals without opening every single one. Totally valid. The trick is making sure each portal is tied to a database item, so you can see status at a glance. It doesn’t need to be complicated:
- 1 database entry per project/portal
- A status property (EX: Onboarding, Content Gathering, In Build, Review, Complete)
- Key dates + last touchpoint
That gives you a clean “Portal Hub” view — a bird’s-eye look at every active project — without clicking into each one. Simple, repeatable, and honestly kind of satisfying to look at.
Next steps
- Send the client one portal link and train them to use comments for questions and feedback. In your Web Design Project template, confirm the Client Portal page is included so it auto-creates with every new project.
- In the Client Portal page, create linked database views for:
- Client Database (filtered to this project’s client)
- Tasks (filtered to this project)
- Meeting Notes (filtered to this project)
- Set up your client access:
- Share page-level access to the main databases as needed (so the linked views can show content).
- Then manually share only the specific task pages and meeting notes you want the client to see.
Want the done-for-you version? 😄
The Web Designer’s Project HQ Template includes a clean Project HQ + client portal structure already set up, so you can start using it today.